Monday 21 December 2020

Fitting the New Peter Gilbert Morgan 7" Wiper Blades.

 Fitting a set of the new Peter Gilbert Morgan 7" Wiper Blades.


These Blades are currently available in 7inch length for the 3 Blade cars and 6inch for the pre 1968 2 Blade cars.

Please Contact Peter at the email address above to establish availability and cost.

One of my new 7 inch blades.


The complete set of three new blades.


A very simple and speedy job to replace my blades. 
The new blades will adopt the same angle and sweep of the existing blades. 

Peter Notes:
Very often the arms need a slight tweak on the bend to ensure that they lay parallel when parked. You would think that the Dealers would pick this up on their Pre Delivery Inspection and sort it out.
It is quite amazing how different the wiper arms are bent to fit the Morgan Car, or not as the case may be in some cases. 
6" Blades have now arrived for the older 2 seater cars and are going down well but I only have a small quantity left.


This is considered to be perfect parking.

It may be possible to bend the arms to get them parallel with the bottom of the windscreen then adjust the arm on the splines to re position. 

There are different arms in use on some models. The Splines are the same but some arms have a spring clip to hold them in place. Others have a screw fitting. 

This owner did 'fine tune' each arm by bending the part arrowed in the photo above so that they now function and park beautifully.

It is never straight forward with a Morgan.

Perhaps leave well alone if they work ok. 

The wiper blades can be easily replaced.

It would appears that my own offside blade could need a little tweak to get it to park parallel. 

However, I will not be tinkering with anything to change the blade arm angles until the blades have been used during heavy rain.

Frank

..............................................

Some user Comments from Talk Morgan.

- For all those interested in Peters new 6" wiper blades for the shorter windscreen I have just fitted a set to my 4/4 and they do not appear out of place and do not look too chunky. They are well made and I am well pleased.

- Yes I agree they are brilliant well worth the money!,,,

- On my car the passenger side is 6 inch whilst the rest are 7 inch as the 7 inch fouls the frame at the top of the arc. The 7 inch worked perfectly on my S1 Roadster. It transferred them to my Brooklands and the n/s one had the blade crossing the screen frame at the top of a stroke. I have a 6 inch unit now that I will test when I collect the car Wed. 

- I agree too, much better quality. Why doesn't the factory fit these?

- Excellent....

- Had to use my wipers with the 6 inch blades today in a heavy downpour mixed with hail.
Must confirm they are really excellent.
Can recommended them.

- The wiper blades are brilliant, much better than my modified Bosch wiper blades. I do have adjustable length wiper arms but I can not find a position that does not let the end of the rubber hit the chromed screen frame at full wipe. Before I order a wiper motor gear with a reduced sweep can anyone tell me what the gear that I should order would be?

- First drive in really heavy rain today, with the new wipers.
WOW...
Proper wipers.....no smearing, just clear wipes on forward and back strokes....
Thanks Peter, possibly the best mod I've made...!!

- Agreed they are brilliant.

..........................................................


Friday 30 October 2020

Simply Enhancing the Cobra High Level Brake Lamp - Version 2

Part One.

Simply Enhancing the Cobra High Level Brake Lamp - Version 2

Having begun the quest to find the Cobra Lamp, seen in this photo, we developed the idea promulgated in our issue of the 1st Version of Enhancing the Cobra 

The Original Target Photo

This effect below was achieved by exposing the Strip of Chromed Plastic which is part of the existing Lamp Holder.

1st Version

Then we were contacted by a member who is a good friend of another Roadster 100 owner. 

He had found the simplest of solutions needed to provide a chrome Bezel for the existing Morgan Cobra.


MINI SIDE LIGHT BEZELS

The Supplier, BriteBritBitz manufactures these items so is the sole supplier.

Classic British Brightwork
Coldnorthcott
St. Teath
Bodmin
Cornwall
PL30 3LL

These chromed bezels were originally sold in pairs but are now sold singly. 


The Bezel Outer.


The Bezel Inner.

 Buy one Bezel for £8.10 plus 1.50 postage


The Simple Bezel Fitted on his Morgan Cobra.

 Fitting this Bezel could not be more simple.

There is no need to remove the Cobra from the car this time. The Lamp Glass is re moved via its two x head screws. 

These screws are also held onto the Glass via their fibre screw retaining washers.


2. Carefully remove the two screws from their fibre washers screw retainers and from the Lamp Glass. 

3. Slide the Bezel over the Lamp Glass and re fit the two screws through the bezel, then through the Lamp Glass and then through the Black Rubber Gromit.

4. Lastly refit the Fibre Washer Screw Retainers to each screw .

5. Re fit the Lamp Glass with Bezel to the Cobra Lamp Holder. 


Project Completed 

Frank

.................................................................................................

Part Two - An Alternative Approach 

Workshop Note: Cobra Update 

by Dave Wellings

This job has been on my list for a long time. 

We've discussed before the fact that the Cobra doesn't have a chrome bezel, and I kept putting off looking into it, thinking that it would be a tough conversion.

The reality is that a standard indicator backplate (L794/795 & L691/692) will fit easily. 
I'd already sourced a couple of backplates from E Bay, a long time ago.
 
If you do this job, don't get the backplate with the double terminals for side and brake lights.

This is the plastic internal unit in the Cobra. 
A nicely made unit, which is secured into the metal casting with a single countersunk Allen bolt visible on the right here.

The original light unit attaches to this using two screws on a bracket.


This is how it looks fitted. 

There are four fixing positions. 

The original bulb holder uses the 12 o'clock and six o'clock positions.


There are two fitted threaded screws in square holes in the backplate which must be drifted out. 

Then the square holes must be extended out slightly, so that the two fixing screws can use the three o'clock and nine o'clock positions. 

Note the cut out at the bottom.


Everything lined up easily and although I thought there would be a step between the light unit and Cobra, in reality this is small.


With everything back together, this really does look much better than the original. 

I used socket headed setscrews, which I've used on all my lights, just because I like the look.


The Finished Cobra 


Friday 23 October 2020

A Practical Hood Stay for the Roadster 100 by David Owens

A Practical Hood Stay for the Roadster 100 

by David Owens 

How many times have you wished you had two pairs of hands when you want to put or remove items on the rear shelf by lifting the rear of the hood? 

This simple method was developed by a member of Talk Morgan. 


The Talk Morgan Version

It is not difficult to make and is an improvement worth doing.

I have also tried it with the Hood folded in the down position and it holds easily.

I have the same issue with the Hood fouling the headrests in the alternate Half Toneau Hood Folding scenario. It is harder to lift up far enough to latch the stay with this folding method and position. 

I have tweaked it a little to come up with the version I made and fitted to Car No. 046.

Materials

1 Piece of 10mm Aluminium Bar – I used 10mm Thick X 25mm Wide and 100mm long. (Purchased off the favorite auction site... www.ebay.co.uk/usr/ukdirectmetals )

1 Piece of 6mm Aluminium Bar – I used 6mm Thick X 20mm Wide and 200mm long. (Purchased off the favorite auction site as above)

1 Piece of 3mm Aluminium Bar – I used 3mm Thick X 10mm Wide and 25mm long.

1off - M6 x 30mm Stainless Countersunk Bolt.

2off - M6 Nylon washers.

1off - Small woodscrew.

Thread Lock Liquid

Tools Required

Vice

Hacksaw

File

Wet & Dry Sandpaper

Solvol Autosol Metal Polish

6.5mm drill

10.5mm countersink drill

3mm drill

Construction Method

1. Starting Point - Cut the 6mm bar to 103mm for the Pivoting Stay.

                           - Cut the 10mm bar to 35mm for the Short Lug.


2. Cut and shape the bars to the dimensions shown.

Use wet and dry paper to remove any marks created by holding the material in the vice and to prepare the metal for polishing. 

I used a Dremel with a buffing pad to speed up polishing but it is not a necessity.

After all are prepared and polished you are ready to put the three pieces onto the car. 

Completed Parts 1 and Part 2 with Screws and 2off Nylon Washers.

Assembly Steps 1. 2. & 3. 

(1) - Remove two existing screws from the hood frame and the hood bracket attaching the hood to the body.

(2) Use the bolt from the Hood Frame to attach Part 1, the 10mm thick Fixed Lug piece, to position 1.

Tighten this up lightly as you will need to move it to get the correct angle for locating part 2. 


The Fixed Position Lug - Piece 1 - Attached.

(3) Use the M6 30mm bolt and two nylon washers to attach Support Arm - Part 2. 

The two washers go between the hood bracket and Part 2. 

One washer fills the original countersunk hole in the existing hood bracket and the second acts as a spacer for Part 2. 

Tighten up lightly so that you can move the stay.

The Pivoting Support Arm - Piece 2 - Attached. 


First Trial Fitting of Both Fixed Lug and Support Stay.

Lift the rear of the hood up until you can swing the hood stay into position to fit into Part 1. Adjust until it fits together snugly. Then tighten up Part 1 to the hood frame.

Fitting Hood Support Stay - Part 3.

For the support bracket - part number 3 - drill a 3mm pilot hole and bend to 90% at 15mm from the top edge. 

You may have to enlarge this hole slightly for the woodscrew you have chosen.

The Hood Stay Support Bracket - Piece 3.

Position the small angle bracket Part 3 in a chosen location to catch and support the hood stay when not in use.

You will need to pilot drill of the correct size into the Wood Frame to allow the bracket to screw on easily. 

Please Remember that the Ash Wood Grain is dense and the last thing you want is to sheer off the wood screw while tightening. 


     The Support Bracket - Positioned to Support The Hood Stay

Completion.

When you are happy with the fit remove just the Hood Stay Bolt and apply some ThreadLock liquid to the threads and reassemble. 

This should prevent the bolt from coming loose due to repeated rotation of the Hood Stay during operations.

The finished article. No more holding up the hood to pack or unload the rear shelf.


David Owens.

Caveat Emptor. - The amount of lift may be raised by extending the length of the Support Stay (piece 2). 

However - care must be taken as making the stay too long could cause the heavy folded hood to tip over into the passenger bay hitting any passenger still sitting in there.

..................................................


Monday 5 October 2020

Virtual All Morgans' Day 2020 - Combat Stress Thank You Letter from Robert Marsh


Virtual All Morgans' Day - 7th June 2020

'Thank You' Letter from Robert Marsh, 
Director of Fundraising, Combat Stress 

With the unfortunate postponement of All Morgans' Day 2020 due to Covid 19 restrictions and the temporary closure of Blenheim Palace, The Organising Team, with your help, carried on fundraising In Support of Combat Stress where possible.

The Letter received today, 5th October 2020, thanking the Register for donating £12457.96 reflected the position when Chris Attwood presented our Donations Cheque to Darren Jackson at Tyrwhitt House.

( While it happens to be addressed to me,  its message is for everyone who has contributed to that fundraising in any small way. Frank )


Darren & Chris with Cheque.


   A PDF Copy of the Letter is attached to this topic below.


We continued our fundraising to the end of September 2020 and drew the line at our final total of £13076.30 and this raises our grand total since 2016 to £39669.78

We now begin fundraising for our 2021 / 22 period.


Thursday 24 September 2020

Enhancing the Cobra High Level Brake Lamp.

 Enhancing the Cobra High Level Brake Lamp.

By David Owens.

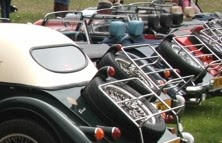
When I spotted this photo, posted on an internet topic, I noticed that the Cobra High Level Brake Lamp on the nearest Morgan  appears to have a Chrome Bezel in the lamp.

Cobra Lamp with Chrome Bezel

Checking through all of my Photos I thought that this brand new Roadster 100 see at the factory also had a Chrome Bezel? 

On closer inspection it is just the sun reflecting on the paintwork.
 
New Roadster 100 Seen at The Morgan Factory

Checking my own Cobra Lamp I initially thought that my Bezel must have fallen off?

No. It appears that no other Morgan Cobras have Chrome Bezels.

My Cobra & Lamp Before Modification.

I shared this Topic with our Register Membership and David Owens became very interested and immediately began a search for a replacement alternative Brake Lamp with a Chrome Bezel.

David, being more curious than me, decided to dismantle his own Cobra Lamp and discovered that hidden within the Plastic Lamp Casing is a Chrome Rim which is part of the exiting lamp.

The Following Report takes us through the Method David used, and I have also followed, to achieve a Chrome Bezel effect on our Cobra High Level Break Lamps.

The Modification Method

1. Remove the car's Baggage Rack and The Spare Wheel - Tool Required - 2 x 13mm spanners.

2. Disconnect the Cobra Lamp Units power cable at the junction block - Lift the securing tab and separate.

3. Remove the plastic screw protector (Missing on my car) and remove the nut securing the cable clip at the base of the light stem. - Tools Required - 8mm spanner.

4. Remove the four wood screws that hold the Cobra Stem on to the wood frame of the car. - Tools Required - Phillips screwdriver.

Four Woodscrews Attaching The Cobra to the Car.

Remove the Cobra unit to the bench onto a soft surface to protect the paintwork.

The Red Lamp Lense showing the Rubber Surround & Fibre Screw Retaining Washers

5. Remove the Red Light Lens Cover taking care not to lose the crew retaining washers - Tools Required - Philips screwdriver.

The Bulb and its Separate Bulb Holder with Two Securing Screws.

6. Remove the Bulb for safety and then Remove the Top & Bottom Bulb Holder screws - Tools Required - Philips Screwdriver. 

Move the Bulb Holder to one side exposing the Lamp to Cobra fixing Screw in the base of the lamp.

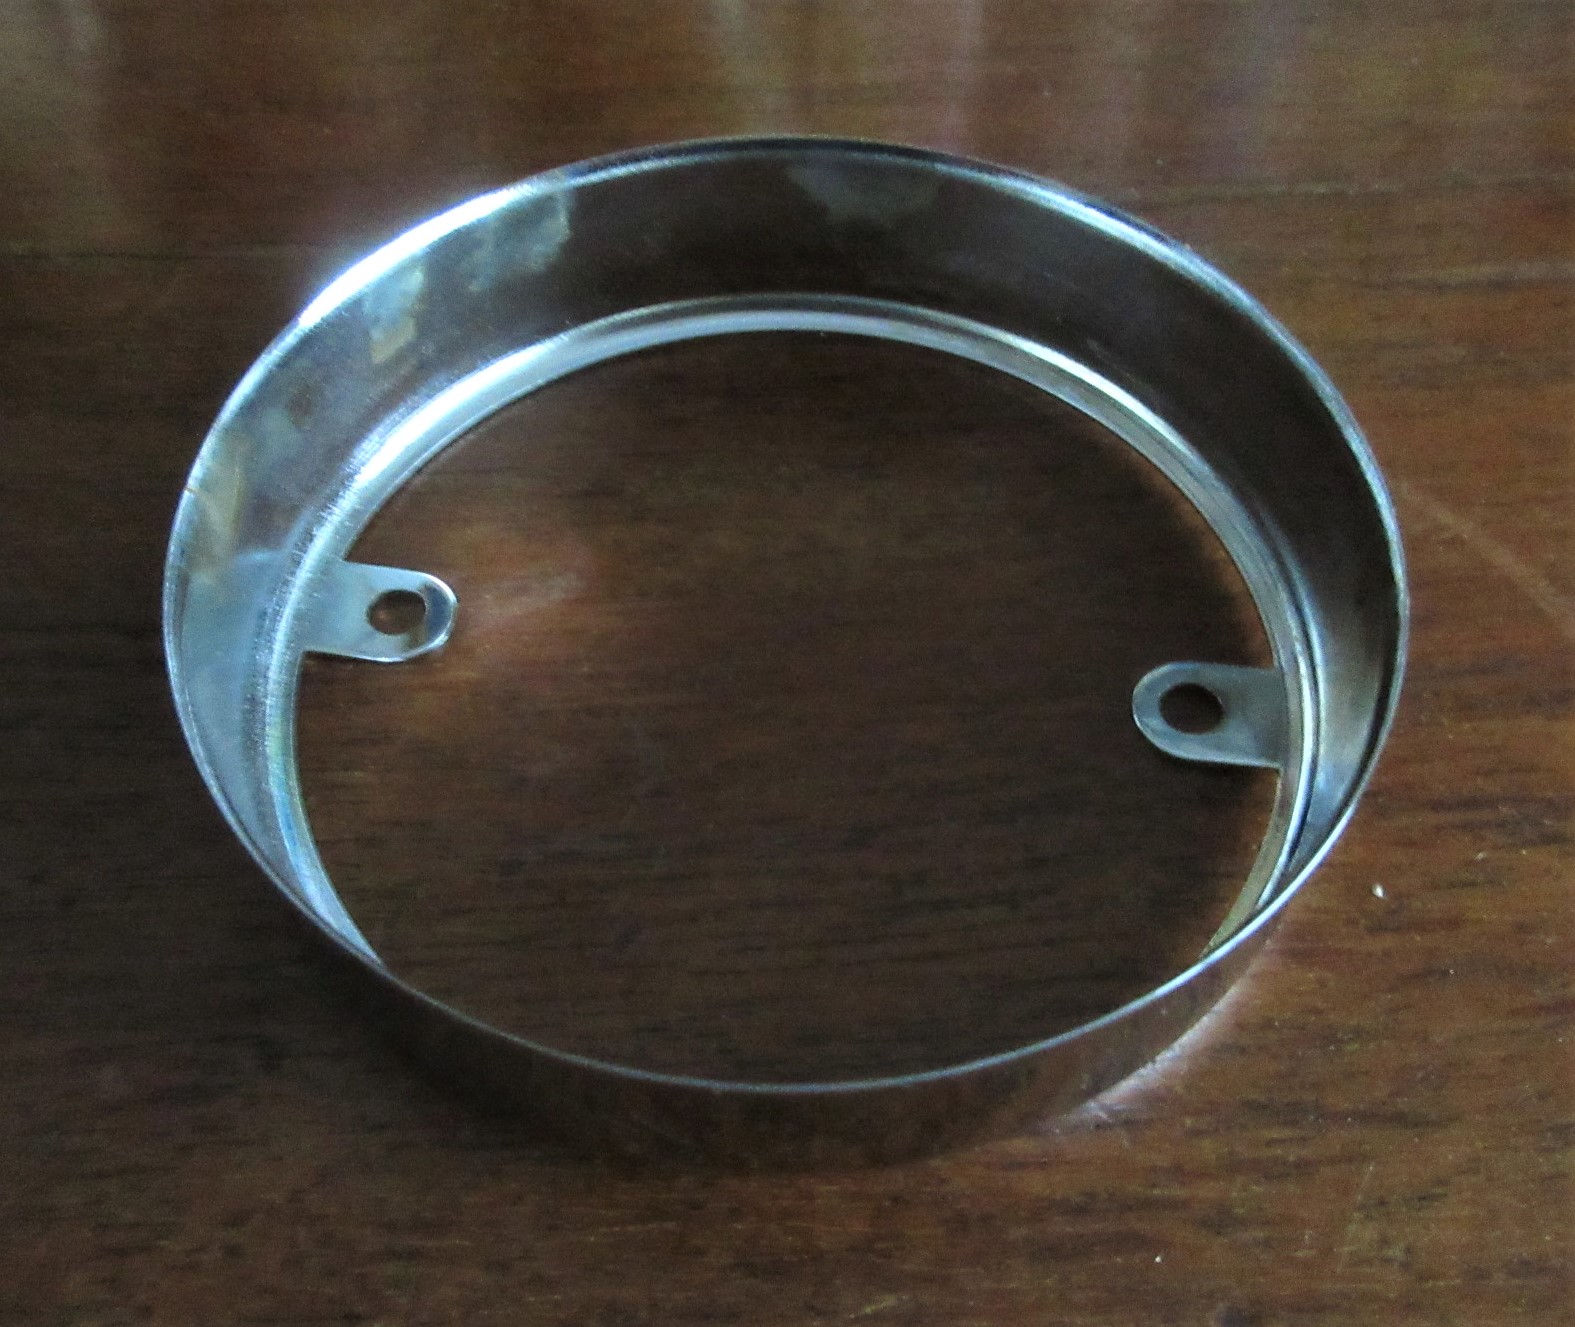
The Chromed Plastic Light Housing showing its Single Fixing Countersunk Bolt in the Base.

7. Unscrew the 6mm Screw ( Bolt on David's Car ) releasing the Light Housing from the Cobra Stem Casting - Tools Required - ( Alan Key on David's - Philips screwdriver on mine)

The Base of the Light Housing Seen Inside the Cobra Casting.

The Gap Between Light Holder & Cobra Housing.

8. Insert the blade of a Screwdriver between the Light Housing and the Cobra Housing and Very Gently Lever Upwards to remove the Light Housing. 

Be careful as the Light Housing is made of Chromed Plastic. 
It does not take a lot of gentle pressure to free off the Tapered Joint.

The Chromed Plastic Light Holder Temporarily Removed from The Cobra.

9. A Spacer needs to be inserted Between the Base of the Light Housing and The Cobra Housing to push forward the Light Housing and expose a ring of Chromed Plastic. 

The depth of Spacer will determine the width of the Chrome Ring. This spacer should be 10mm to be in line with the other rear lamps.

David originally used a Metal Spacer with a 6mm Hole drilled in the center but has since replaced this with a far better option being a Firm Rubber Spacer fabricated from a Demijohn Bung. 

David's Rubber Spacer Fabricated from a Demijohn Bung.

I have fabricated a spacer from Softer Cork but will also seek out a similar Firm Rubber material from which to make my own Spacer.

My Champagne Cork Supply.

Drilling the Hole in the Center of my Cork

Cutting the 10mm Spacer Depth.


9a. Because of the Extra Depth of the 10mm Spacer, the Original 15mm Tapered Bolt is now too short so a replacement 25mm Countersunk Stainless Steel Bolt is required. 

I happened to already have a couple of extra long Countersunk Bolts, so set about to reduce its length. 

The 8mm Nut from the Cable Clamp was a useful aid to this process.  

Setting the Nut at 25mm ready for cutting off the excess thread.

 When the nut is removed after cleaning the sawn end it will re cut the entry part of the sawn thread.

Cutting the Bolt.

Filing the Cut End with the Nut Still in Place.

Using the Nut to Lift the Burr.

Finishing the Cut Using Emery Cloth.


My Cork Spacer Layout.
a) Light Holder
b) Bolt
c) Large Washer (to sit over the Small Extension on The Base of the Light Holder).
d) Cork Spacer.
e) Small Washer (to Bed into the Cork Spacer). 


Assembling the Pieces Ready for Fitting.

Ensure that the Light Housing is Re Inserted with the Cable Exit Visible as seen in this Photo

The Assembly Bolted back into The Cobra.

For Ease of Assembly hold the Light Fitting Vertically with your Finger holding the Bolt upright from Inside. 

This is so that the Washers & Spacer can't fall off of the Bolt. 

Lower the Cobra Housing onto the Bolt ready for Screwing together using, in my case, the Philips Screwdriver ensuring not to Overtighten and Break the Plastic Holder.  


10. Re Assemble the Bulb Holder into the Light Holder with the Two Screws ensuring that the Bulb Holder is in the Vertical location as the photo.

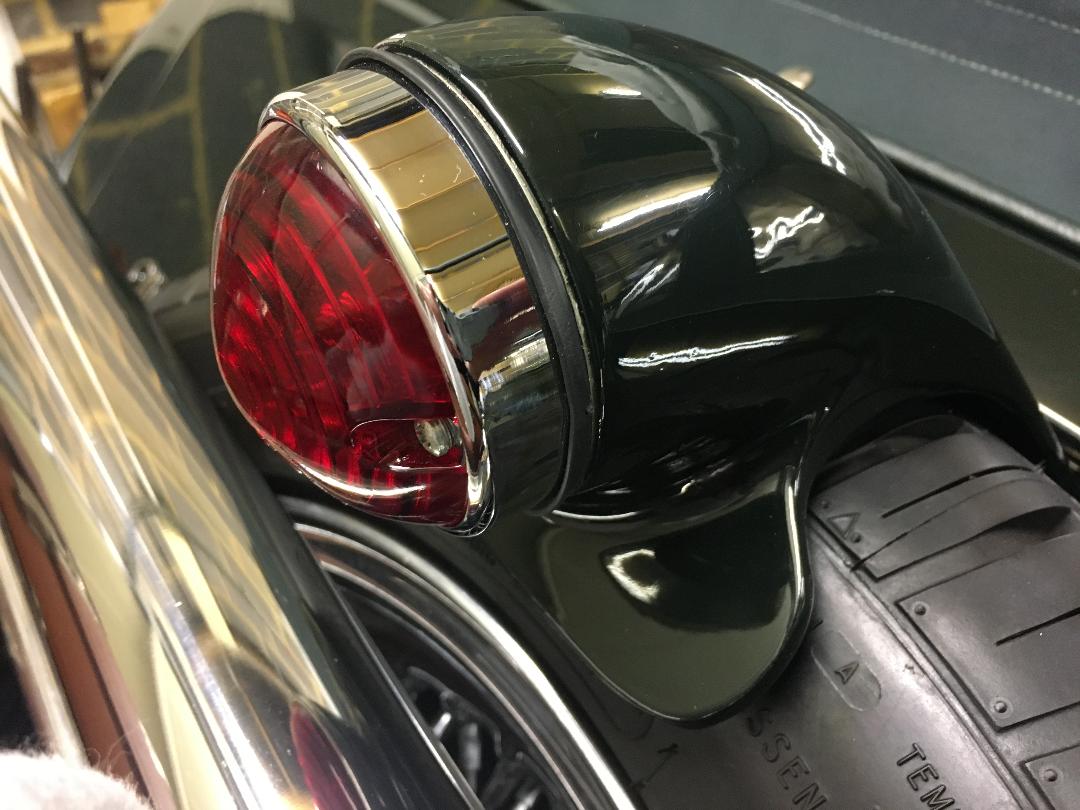
The 10mm Chrome Bezel Achieved.


As a personal enhancement I have covered the Cable in its slot using Black Gorilla Tape.


While the Spare Wheel is out, Here is a photo of the 'Y' Splitter I had made which fits into the Cobra Cable Joint.

This provides an extra powered side cable with identical Sockets needed to facilitate the attachment of my Suitcase Strap High Level Break Lamp Cable. 

Simple and Effective.


Also, When I replaced my two Lower Cobra Wood Screws I inserted this 3mm Perspex Spacer to slightly 'Lift' the Cobra Top allowing me to slide the Spare Wheel back in easily.

Before this, the jamming of the Spare Wheel under The Cobra strained and loosened the original screws. 

The Reassembled Cobra with My Spare Wheel Fitted.

The Vertical Location of the Spare Wheel is determined by the Centre Bolt.
Maybe, with my New & Tightened Top Screws, the Spacer Thickness needs to be Reduced to bring the Cobra into the Tyre once more?

Frank
........................................................................

The Morgan Centenary Trim Pack

  The Morgan Centenary Trim Pack During The Centenary of The Morgan Motor Company the owners of new Morgans in build were offered the variou...